How to Add the Tmailor Temp Mail Extension to Chrome
No separate extension account and no extra password to create. Sign in once on tmailor.com in any tab, and the icon in your toolbar does the rest.
Quick access
What the Tmailor extension actually does
To install the Tmailor temp mail extension on Chrome, open its Chrome Web Store listing, click Add to Chrome, confirm the permission prompt, then pin the icon to your toolbar. Sign in once on tmailor.com in any tab, and the extension connects automatically. There is no separate extension login or password to create.
The extension keeps a disposable Tmailor address close to the signup form you are using, so you do not have to keep a tmailor.com tab open just to grab an address. Tmailor is receive-only: it cannot send email, and inbox messages clear after about 24 hours. Use it when you want to keep your personal email address private during a signup.
Two limits worth knowing before you start: the Microsoft Edge Add-ons listing is still pending review, so Edge users should use the Chrome Web Store installation route instead. Safari uses a separate macOS-only package and is outside this Chrome walkthrough. For other installation options, see the Tmailor browser extension page.
Step 1: Open the Chrome Web Store listing
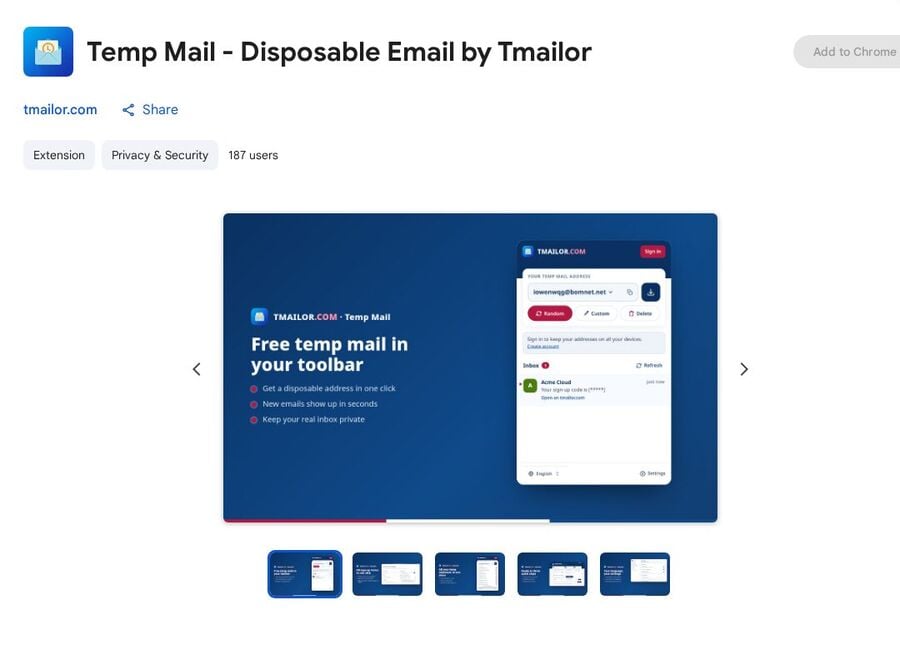
Search "Tmailor" in the Chrome Web Store, or open its listing directly: https://chromewebstore.google.com/detail/opmplmnbibcfpgjhcgipefpfljhedomp. Check that the listing is named "Temp Mail - Disposable Email by Tmailor."
Step 2: Click "Add to Chrome" and confirm the prompt
Click the Add to Chrome button in the top right of the listing. Review the permissions Chrome displays, then click Add extension to confirm; the exact wording can vary with the extension's permissions and your Chrome security settings. That confirmation dialog is Chrome's own, not anything Tmailor customizes.
If the button is unavailable, check that you are in a regular Chrome window rather than a Guest or Incognito one; a work or school administrator can also restrict extension installs. Once added, open Tmailor's own welcome screen (it opens automatically in a new tab for most people) to review pinning, filling an email field, and optional sign-in for sync.
Step 3: Pin the icon, then try the fill button
The welcome screen that opens after install covers the two things most people miss on a first install: pinning the icon so it is visible and trying the one-click fill before you need it on a real form. Click the puzzle-piece icon at the top right of Chrome, then click the pin next to "Temp Mail - Disposable Email by Tmailor" so it stays on the toolbar instead of hiding in that menu.
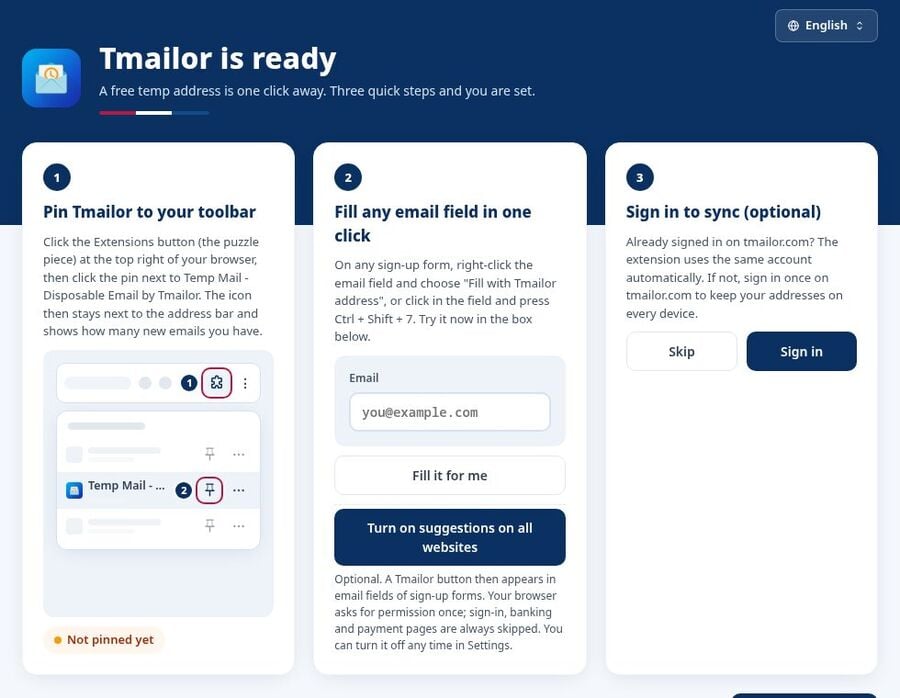
Before testing the fill action, open the popup and click Random if it shows "No address yet," since the fill command fills whichever address is current. Then, on the welcome screen's second card, click Fill it for me to try the sample field, or press Ctrl+Shift+7 (Control+Shift+7 on a Mac). On a real signup form later, right-click any email field and choose "Fill with Tmailor address," or use the same shortcut.
That second card also has a Turn on suggestions on all websites button. Leave it off if you would rather trigger the fill yourself; sign-in, banking, and payment pages stay excluded from suggestions either way. The third card, "Sign in to sync (optional)," lets you sign in now or choose Skip.
Step 4: What you'll see after it connects
Click the pinned icon, and you'll get a small popup, not a new tab, with an empty "Your Temp Mail Address" field and three buttons: Random, Custom, and Delete. If you are not already signed in on tmailor.com, a Sign in button sits in the top corner; tapping it opens the normal tmailor.com login, and the extension connects using that same session, with no separate extension password.
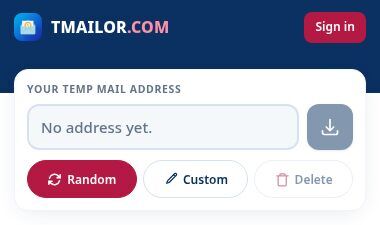
Click Random to generate your first address from the popup, or Custom to pick the name yourself. Once you are signed in, the popup lists up to 10 addresses you already have saved. See the guide to running multiple temp mail inboxes if you want to switch between several at once. Use the web inbox to read your messages, and note that inline suggestions only work on secure, HTTPS pages.
Why the fill button might not show up on a page
If an inline suggestion is missing, first check whether the page uses HTTPS; suggestions do not work on plain HTTP pages, and no setting changes that. Sign-in, banking, and payment pages are always excluded from suggestions too, regardless of what you toggle.
On an eligible HTTPS signup page, check whether suggestions are turned on for that site, or whether "Suggest addresses on all websites" is on in Settings. Either way, you can still use the manual fill command, right-click or the keyboard shortcut, on a supported field even with automatic suggestions off.
Customize how it works
The Settings page covers the things people usually want to change beyond that one toggle: the keyboard shortcut, new-mail alerts, and your sign-in. Open it from the gear icon at the bottom of the popup; the sidebar also has separate rows for Language and Account if you need those.
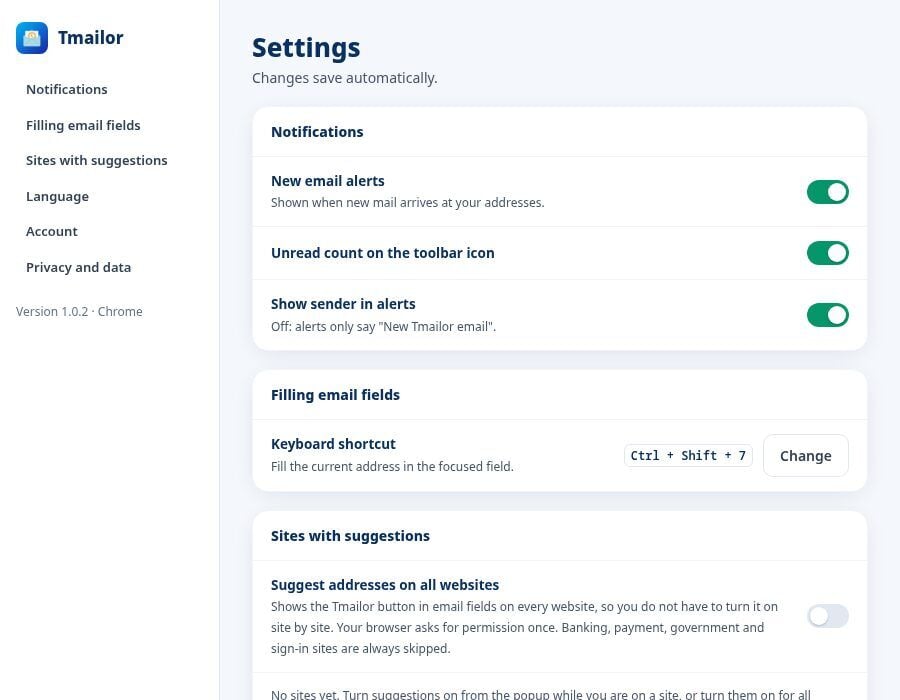
New email alerts controls whether a new message triggers an alert at all, and Unread count on the toolbar icon controls the badge. Turn Show sender in alerts off for a generic "New Tmailor email" notification instead of one naming the sender. Under Keyboard shortcut, click Change if Ctrl+Shift+7 clashes with something else already bound in Chrome.
Removing the extension
Go to chrome://extensions, find "Temp Mail - Disposable Email by Tmailor," and click Remove, or right-click the pinned icon and choose Remove from there. Your tmailor.com account and any saved addresses are unaffected either way; you only lose the toolbar shortcut, not the web inbox itself.
Still want the extension on another browser?
Edge users can install Tmailor from the Chrome Web Store while its Microsoft Edge Add-ons listing is pending review; if Edge asks you to allow extensions from other stores, select Allow, then review and confirm the install. Most other Chromium-based browsers support the same Chrome Web Store route too. Firefox has its own listing, and Safari ships as a separate macOS package; the browser extension overview lists the current store link and supported version for each one.
Frequently Asked Questions
Do I need to create a separate account to use the extension?
No. The extension connects to the same account you use on tmailor.com; signing in once on the website is enough, and there is no separate extension password.
Is the Tmailor extension safe to install?
Review the permissions Chrome displays before installing. Tmailor's inline address suggestions are opt-in, either for individual sites or across websites. Sign-in, banking, and payment pages are always excluded from suggestions, even when suggestions are turned on everywhere.
Can I install the Tmailor extension in Microsoft Edge?
Yes. While its Microsoft Edge Add-ons listing is pending review, install Tmailor from the Chrome Web Store instead. If Edge asks you to allow extensions from other stores, select Allow, then review and confirm the install.
How do I uninstall the Tmailor extension?
Open chrome://extensions and click Remove next to it, or right-click its pinned icon and choose Remove. Your tmailor.com account and saved addresses stay intact.
If you just need an address right now
You do not need the extension at all to use Tmailor. Create a free temp mail address directly on the website in one click, no install and no account required, and add the extension later if you end up signing up for things often enough to want the shortcut.

Marcus Lee writes Tmailor's step-by-step guides, signing up to apps and platforms with temp mail, using the mobile app and Telegram bot, custom domains, reusing addresses, and getting the most out of disposable email day to day.